Ceasta: how to create custom text area using contenteditable element
Find out how to create adjustable text area using the contenteditable element and add text highlighting.
We can find text areas on almost every website. They are easy and fast to use, but sometimes we need something more adjusted to our needs. Unfortunately, text areas are not highly customizable. There is a possibility to change style and size of the box itself, but it is impossible to change behavior and look of the text inside. In our case, we want to bold words containing certain phrase in a real-time when user is typing. This use case is impossible to implement with classic text area DOM element, so to achieve this we need contenteditable div, proper styles and some javascript magic.
BASIC SETUP
Starting setup is really simple, I just need to replace text area with a div:
<div id="textarea" contenteditable>I look like a textarea</div>
Then, I style it to make it look more like text area:
#textarea {
  -moz-appearance: textfield-multiline;
  -webkit-appearance: textarea;
  border: 1px solid gray;
  font: medium -moz-fixed;
  font: -webkit-small-control;
  height: 28px;
  overflow: auto;
  padding: 2px;
  resize: both;
  width: 400px;
  white-space: pre-wrap;
}
By using this simple html and css I achieved text area with a certain look and behavior. Its functionality will be determined by javascript and jQuery.
Firstly, I define Ceasta class to simplify its usability and to wrap the entire code connected with my text area in one place. Of course, I need to pass into constructor jQuery object connected with the area. To make it more personalized for users' needs or future purposes I also add placeholder and highlight options, so a programmer could choose what is supposed to be bolded.
constructor($textArea, placeholder, highlight) {
  if (placeholder == null) {
    placeholder = 'Test';
  }
  if (highlight == null) {
    highlight = 'Lorem';
  }
  this.$textArea = $textArea;
  this.placeholder = placeholder;
  this.highlight = highlight;
  this.value = this.$textArea.val();
  this.placeholderDisplay = false;
  this.init();
}
The next thing to do is to simulate placeholder's behavior. For this purpose, I define two jQuery events: one when a box is focused and one when it's not. In focusin, placeholder disappears and in focusout it is displayed again unless there is text inserted inside.
focusEvents() {
  this.$textArea.on('focusin', e => this.cleanPlaceholder());
  this.$textArea.on('focusout', e => {
    if (this.$textArea.text()) {
      return;
    }
    this.setPlaceholder();
  });
}

setPlaceholder() {
  if (this.placeholderDisplay) {
    return;
  }
  this.$textArea.text(this.placeholder);
  this.placeholderDisplay = true;
}

cleanPlaceholder() {
  if (!this.placeholderDisplay) {
    return;
  }
  this.$textArea.text('');
  this.placeholderDisplay = false;
}
For just convenience purpose I’ve decided to also add val method that would return value of an element or assign it if an argument is passed.
val(value = null) {
  if (value === null) {
    return this.value;
  } else {
    this.$textArea.text(value);
    return (this.value = value);
  }
}
Finally, it is time to implement major functionality of highlighting. My solution is to replace current text in div with the same text, but with bolded words containing highlight fragment. First I delete all existing <b> tags to avoid duplications. Then detect words of my interest and replace them wrapped in <b> tag.
adjustText(regexp) {
  let $textArea = this.$textArea;
  $textArea.html($textArea.html().replace(/<b>|<\/b>/g, ''));
  $textArea.html(
    $textArea.html().replace(new RegExp(regexp, 'g'), '<b>$1</b>')
  );
  this.value = $textArea.text();
}
DEALING WITH ISSUES
Unfortunately, this solution comes with new obstacles. In contenteditable elements, when content is changed programmatically, for example with the use of html() or text() method, cursor resets its position to the beginning of a text with startOffset set to 0. To overpower this problem I create a new class called Selection.
The fact that some of the words would end up in <b> tags, complicates the situation even more as it creates new node in DOM tree every time. Also, when new line is entered, new node is created. So there can be multiple layers of nested nodes.
To solve this problem I’ve created new methods:
saveCurrentSelection() {
  this.currentSelection = this.getSelection();
  this.startOffset = this.currentSelection.startOffset;
  this.currentOffset = this.sumCurrentOffset(
    this.$container,
    this.currentSelection.startContainer,
    this.startOffset
  );
}
First we fetch Range object containing informations about current cursor position:
getSelection() {
  if (window.getSelection) {
    return window.getSelection().getRangeAt(0);
  } else if (document.selection) {
    return document.selection.createRange();
  }
}
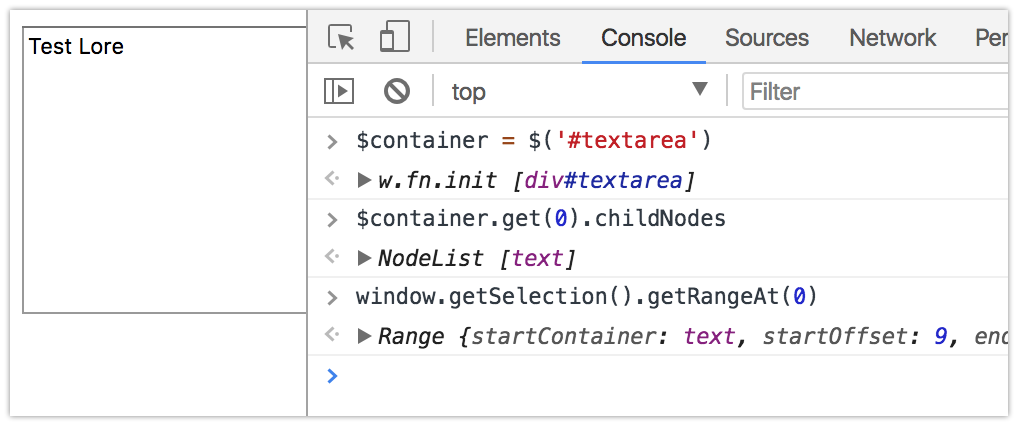
The most important data inside this object is startOffset. At first, my thought was it fixes all my problems and this attribute tells me everything I need. It actually turned out that it is offset only for node in which cursor is positioned currently. So if we are typing text that is supposed to be bolded, it would suddenly change the node structure. Current node in which cursor is positioned would be different after inserting a new html than before.
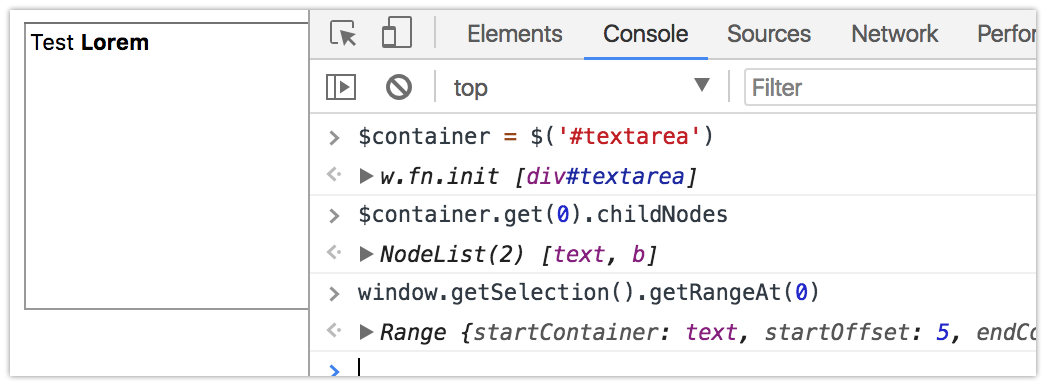
As a new node is created and a cursor is currently inside of it startOffset changed from 9 to 5.
The most important part of saveCurrentSelection is sumCurrentOffset.
sumCurrentOffset(root, node, startOffset) {
  for (let ele of Array.from(root.childNodes)) {
    if (node === ele) {
      break;
    }
    if (ele.contains(node)) {
      const result = this.sumCurrentOffset(ele, node, 0);
      startOffset += result;
      break;
    } else {
      startOffset += ele.textContent.length;
    }
  }
  return startOffset;
}
It simply sums up the length of a text in every node that is before a cursor position and the number of characters in node in which a cursor actually is. As there is the possibility of different scenarios (where nodes can be nested in multiple layers and there might be many of them on one layer) I’ve used recursion to make sure that no node is omitted.
My general plan is to save current position, invoke adjustText method and, at the end, place cursor in proper node using previously saved data.
So, the next step is to implement method that would look up for the node where cursor should be placed. For this reason, I’ve created the following methods:
findNodeForPosition($container, currentOffset) {
  let node;
  ({ node, currentOffset } = this.findNode(
    $container.childNodes,
    currentOffset
  ));
  if (node.childNodes.length === 0) {
    return { node, currentOffset };
  } else {
    return this.findNodeForPosition(node, currentOffset);
  }
}

findNode(childNodes, currentOffset) {
  for (let node of Array.from(childNodes)) {
    if (currentOffset - node.textContent.length <= 0) {
      return { node, currentOffset };
    } else {
      currentOffset -= node.textContent.length;
    }
  }
}
It is also based on recursion and it's an opposite of sumCurrentOffset. It goes through every node and subtracts its length from currentOffset variable. When it is 0 or less it means that this is the node where cursor should be present and it’s time to stop digging - the number left in currentOffset is the precise position inside of found node.
Now, knowing in which node the current position is I’ve implemented method for restoring selection in the proper place:
restoreSelection() {
  let node;
  if (this.currentOffset === 0) {
    return;
  }
  const range = document.createRange();
  ({ node, currentOffset: this.currentOffset } = this.findNodeForPosition(
    this.$container,
    this.currentOffset
  ));
  range.setStart(node, this.currentOffset);
  range.collapse(true);
  const sel = window.getSelection();
  sel.removeAllRanges();
  sel.addRange(range);
}
FINAL SOLUTION
The entire Selection is shown below. I’ve put this entire code in a class as I prefer to have a separation between positioning cursor logic and code that is connected directly with custom text area.
class Selection {
  constructor($container) {
    this.$container = $container;
  }

  getSelection() {
    if (window.getSelection) {
      return window.getSelection().getRangeAt(0);
    } else if (document.selection) {
      return document.selection.createRange();
    }
  }

  sumCurrentOffset(root, node, startOffset) {
    for (let ele of Array.from(root.childNodes)) {
      if (node === ele) {
        break;
      }
      if (ele.contains(node)) {
        const result = this.sumCurrentOffset(ele, node, 0);
        startOffset += result;
        break;
      } else {
        startOffset += ele.textContent.length;
      }
    }
    return startOffset;
  }

  findNodeForPosition($container, currentOffset) {
    let node;
    ({ node, currentOffset } = this.findNode(
      $container.childNodes,
      currentOffset
    ));
    if (node.childNodes.length === 0) {
      return { node, currentOffset };
    } else {
      return this.findNodeForPosition(node, currentOffset);
    }
  }

  findNode(childNodes, currentOffset) {
    for (let node of Array.from(childNodes)) {
      if (currentOffset - node.textContent.length <= 0) {
        return { node, currentOffset };
      } else {
        currentOffset -= node.textContent.length;
      }
    }
  }

  saveCurrentSelection() {
    this.currentSelection = this.getSelection();
    this.startOffset = this.currentSelection.startOffset;
    this.currentOffset = this.sumCurrentOffset(
      this.$container,
      this.currentSelection.startContainer,
      this.startOffset
    );
  }

  restoreSelection() {
    let node;
    if (this.currentOffset === 0) {
      return;
    }
    const range = document.createRange();
    ({ node, currentOffset: this.currentOffset } = this.findNodeForPosition(
      this.$container,
      this.currentOffset
    ));
    range.setStart(node, this.currentOffset);
    range.collapse(true);
    const sel = window.getSelection();
    sel.removeAllRanges();
    sel.addRange(range);
  }
}
With Selection class completed I am able now to finish implementing jQuery event, triggered on keyup:
inputEvent() {
  this.$textArea.on('keyup', e => {
    this.onInputText(e);
  });
}

onInputText(e) {
  const regexp = `\\b(${this.highlight}\\w*)`;
  if (e.which !== 13 && this.val() != this.$textArea.text()) {
    this.selection = new Selection(this.$textArea.get(0));
    this.selection.saveCurrentSelection();
    this.adjustText(regexp);
    this.selection.restoreSelection();
  }
}
As you can see, cursor and text methods are invoked only when the pressed key is different than Enter and typed text is different than previously. I create new object of Selection class then operate on functions that implementation I’ve explained above in the article.
Full implementation of Ceasta class looks like that:
class Ceasta {
  constructor($textArea, placeholder, highlight) {
    if (placeholder == null) {
      placeholder = 'Test';
    }
    if (highlight == null) {
      highlight = 'Lorem';
    }
    this.$textArea = $textArea;
    this.placeholder = placeholder;
    this.highlight = highlight;
    this.value = this.$textArea.val();
    this.placeholderDisplay = false;
    this.init();
  }

  init() {
    this.setPlaceholder();
    this.inputEvent();
    this.focusEvents();
  }

  inputEvent() {
    this.$textArea.on('keyup', e => {
      this.onInputText(e);
    });
  }

  onInputText(e) {
    const regexp = `\\b(${this.highlight}\\w*)`;
    if (e.which !== 13 && this.val() != this.$textArea.text()) {
      this.selection = new Selection(this.$textArea.get(0));
      this.selection.saveCurrentSelection();
      this.adjustText(regexp);
      this.selection.restoreSelection();
    }
  }

  adjustText(regexp) {
    let $textArea = this.$textArea;
    $textArea.html($textArea.html().replace(/<b>|<\/b>/g, ''));
    $textArea.html(
      $textArea.html().replace(new RegExp(regexp, 'g'), '<b>$1</b>')
    );
    this.value = $textArea.text();
  }

  focusEvents() {
    this.$textArea.on('focusin', e => this.cleanPlaceholder());
    this.$textArea.on('focusout', e => {
      if (this.$textArea.text()) {
        return;
      }
      this.setPlaceholder();
    });
  }

  val(value = null) {
    if (value === null) {
      return this.value;
    } else {
      this.$textArea.text(value);
      return (this.value = value);
    }
  }

  setPlaceholder() {
    if (this.placeholderDisplay) {
      return;
    }
    this.$textArea.text(this.placeholder);
    this.placeholderDisplay = true;
  }

  cleanPlaceholder() {
    if (!this.placeholderDisplay) {
      return;
    }
    this.$textArea.text('');
    this.placeholderDisplay = false;
  }
}
That is basically a full implementation of custom made text area, using contenteditable div and with troubleshooting all the obstacles that come with it.
In the next part I would like to explain how I’ve turned this code into webpack project, added some tests and minified javascript source files to make it work like the library. Stay tuned!
Credits: photo by Adam jang from Unsplash