How to make an Xcode cleaner app for macOS
In one of the previous tutorials, I was showing how to make a simple AppleScript that would clear cache generated by an Xcode app. This time we’ll make a macOS app that will mostly do the same, but we are going to add more features. Let’s face the challenge and take a look at the code!
A new macOS Xcode project
First, we need to create a new Xcode project - directly for macOS. So choose Cocoa App and give a product name for the app.
I prefer not to use Storyboards, so in this tutorial we will use the xib window manager. After creating a new project, let's go to the automatically created MainMenu.xib file. Since we don’t need a main menu bar, let’s delete it. What we need is a Window object (NSWindow) which is also automatically created.
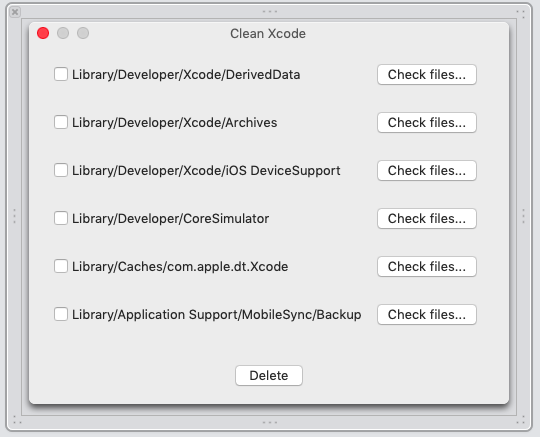
Let’s edit this file. Based on our previous tutorial, we will need 6 paths for Xcode cache files:
Library/Developer/Xcode/DerivedData
Library/Developer/Xcode/Archives
Library/Developer/Xcode/iOS DeviceSupport
Library/Developer/CoreSimulator/Devices
Library/Caches/com.apple.dt.Xcode
Library/Application Support/MobileSync/Backup
I decided to use NSButton with check option for these paths. Additionally, I added Check files buttons that will redirect the user to Finder. This is just to view the files before deleting them. And, last but not least, the „move to trash” button. Eventually, my Clean Xcode window will look like this:
NSWindowController
Now, let’s make the NSWindowController for managing data & actions. This one should have pinned all button delegates and delegate two actions:
onOpenFinderAction,
onSelectPaths
The first action will redirect the user to a specific path in Finder, while the second will add a selected path to the array. After this, the user will be able to delete cached file(s). For clearer data management, I created a new Swift file called PathsToFolders with simple a struct:
public struct PathsToFolders {
    let user = FileManager.default.homeDirectoryForCurrentUser.path
    let derivedData = "/Library/Developer/Xcode/DerivedData"
    let archives = "/Library/Developer/Xcode/Archives"
    let deviceSupport = "/Library/Developer/Xcode/iOS DeviceSupport"
    let coreSimilator = "/Library/Developer/CoreSimulator/Devices"
    let dtXcode = "/Library/Caches/com.apple.dt.Xcode"
    let backup = "/Library/Application Support/MobileSync/Backup"
}
This struct will be used when the user presses the "Check file” button:
    @IBAction func onOpenFinderAction(_ sender: NSButton) {

        if sender == derivedDataButton {
            path = paths.derivedData
        } else if sender == archivesButton {
            path = paths.archives
        } else if sender == deviceSupportButton {
            path = paths.deviceSupport
        } else if sender == coreSimulatorButton {
            path = paths.coreSimilator
        } else if sender == dtXcodeButton {
            path = paths.dtXcode
        } else if sender == backupButton {
            path = paths.backup
        }
        NSWorkspace.shared.selectFile(nil, inFileViewerRootedAtPath: paths.user + path)
    }
The second function (onSelectPaths) is for selecting paths for files that we want to remove. Take a look to see how it works:
    @IBAction func onSelectPaths(_ sender: NSButton) {
        if sender.state == .on {
            let pathUrl = FileManager.default.homeDirectoryForCurrentUser.appendingPathComponent(("/" + sender.title), isDirectory: true)
            selectedPaths.append(pathUrl)
        } else {
            let pathUrl = FileManager.default.homeDirectoryForCurrentUser.appendingPathComponent(("/" + sender.title), isDirectory: true)
            if let index = selectedPaths.index(of: pathUrl) {
                selectedPaths.remove(at: index)
            }
        }
    }
This action is called when the button is pressed. If the button sender state is selected - a path is added to the previously declared array (var selectedPaths: [URL] = []). Before we use this array though, we need to prepare the action for deleting files first.
Xcode cache files Delete Manager
So now, let’s build a manager for deleting files from the Xcode cache. We need to create a new Swift file - let’s call it DeleteManager. This will be a public class that can be easily used outside. The main function will take URL(s) as parameters and will return Bool (whether deleting files was successfull or not). So the whole function will look like this in the end:
    class func delete(cache: [URL]) -> Bool {
        for cc in cache {
            do {
                for file: String? in try! FileManager.default.contentsOfDirectory(atPath: cc.path) {
                    try? FileManager.default.removeItem(atPath: "\(cc)\(file ?? "")")
                }
            }
        }
        return false
    }
When this is done, we can move back to our main NSWindowController from which we manage all actions. We need to add a new action called onDeleteAction that will be called on button’s press. This will works only if selectedPaths array has more that 1 elements:
    @IBAction func onDeleteAction(_ sender: NSButton) {
        if selectedPaths.count >= 1 {
            DeleteManager.delete(cache: selectedPaths)
        }
    }
This is very easy, but of course we should also remember, that the user should be informed, if deleting actions for some reasons didn’t work. So at last we should create a NSAlert or a label with information for the instances when removing Xcode cache didn’t succeed. Either way, our project is done. We can now build it for testing or archive it a new macOS app.
Thanks for reading this tutorial. You can find the whole code of the Xcode Cleaner in our repository. Please, like us, if this tutorial was helpful, if you have questions - feel free to comment! If you are searching for a skilled, agile team to provide a web/mobile solution for your business, don't hesitate to get in touch with us.
Photo by Nikita Vantorin on Unsplash